by Feeling Great | Dessert Recipes
Chocolate Pecan Brownies with Peanut Butter Frosting
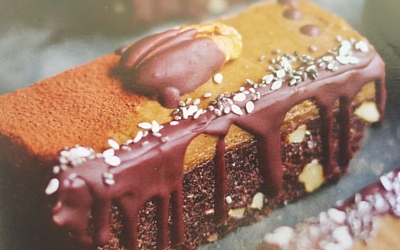
Chocolate Pecan Brownies with Peanut Butter Frosting Guilt-Free Treat
Indulge in these rich, fudgy chocolate pecan brownies topped with creamy peanut butter frosting. Every bite is pure bliss!
This recipe puts a healthy spin on the classic brownie, making it perfect for a celebration or a special treat. Plus, it’s vegan, gluten-free, and naturally sweetened, so you can enjoy it guilt-free.
Packed with nuts, cacao, and natural sweeteners, these brownies offer a delicious way to satisfy your chocolate cravings while still nourishing your body.
Ingredients for Chocolate Pecan Brownies with Peanut Butter Frosting
Brownie Base
- 2 cups pecans (or walnuts), processed into flour
- 1½ cups dates, soaked & drained
- 2 tbsp mesquite (optional)
- ½ tsp Himalayan sea salt
- ⅔ cup raw cacao
- ½ cup coconut flour
- ¼ cup rice malt syrup
Peanut Butter Frosting
- 1 small avocado
- ¼ cup natural peanut butter
- ¼ cup coconut cream
- 2 tbsp coconut oil, melted & cooled
- 2-3 tbsp rice malt syrup
How to Make Chocolate Pecan Brownies
Prepare the Brownie Base
- In a high-speed food processor, blend all brownie ingredients until a dough forms.
- Press the mixture into a lined cake tin and place it in the fridge.
Make the Frosting
- Add all frosting ingredients to a blender and blend until creamy and smooth.
- Spread evenly over the brownie base.
Set & Serve
- Place the brownie in the freezer to set.
- Optional: Drizzle with melted dark chocolate and sprinkle chia seeds on top.
- Allow 20 minutes to defrost before serving.
Storage Tips
- Fridge: Keeps for 3-4 days in an airtight container.
- Freezer: Stays fresh for several months—perfect for meal prepping!
Enjoy this rich, chocolatey delight and share it with friends! Read the recipe of Raw Pecan Bliss Balls or try this Lemon Curd Pie If you love it, let us know how it turned out in the comments.
BOOK HERE – Let’s Get You Back on Track!

by Feeling Great | Dessert Recipes, Recipes, Vegetarian Recipes
Raspberry and Pistachio Cheesecake Squares
A Creamy, No-Bake Treat with a Crunchy Twist
These Raspberry & Pistachio Cheesecake Squares are the perfect no-bake dessert. They have a smooth, creamy texture, bursts of fresh raspberries, and a delightful crunch from pistachios. Plus, they’re vegan, dairy-free, and naturally sweetened, making them a fantastic option for those who love cheesecake but need a lighter alternative.
The best part? Leftovers freeze well, so you can enjoy them anytime!
Ingredients (Makes 16 Squares)
Base
- 1 cup raw pistachios, shelled
- 2 Tbsp melted coconut oil
- 5 Medjool dates, pitted
- Pinch of salt
Filling
- 3 cups cashews, soaked for 4 hours, then drained
- 1.5 Tbsp honey (or rice malt syrup)
- 1/4 cup lemon juice
- 1/4 cup melted coconut oil
- 1 tsp natural vanilla extract (or vanilla powder)
- 1/2 cup raspberries (fresh is best)
- 3 Tbsp pistachios, roughly chopped
How to Make Raspberry and Pistachio Cheesecake Squares
- Prepare the Tin: Line a 20cm square cake tin with parchment paper, ensuring it overhangs two sides for easy removal.
- Make the Base: In a food processor, blend pistachios, coconut oil, dates, and salt until a soft, crumbly dough forms. Press evenly into the lined tin and place in the fridge to chill.
- Blend the Filling: In a high-speed blender, combine soaked cashews, honey, lemon juice, coconut oil, and vanilla. Blend until the mixture becomes smooth and creamy.
- Fold in the Raspberries: Gently mix in half of the raspberries, then spread the filling over the chilled base. Tear the remaining raspberries into smaller pieces and press them into the top.
- Set in the Fridge: Smooth the surface, cover with parchment paper, and refrigerate for 1-2 hours until firm.
- Slice & Serve: Lift the cheesecake from the tin and place it on a cutting board. Cut into 16 squares and sprinkle with chopped pistachios.
- Storage Tips: Keep in an airtight container in the fridge for up to 4 days or freeze for up to 3 months.
Why You’ll Love This Recipe
- No baking required – Quick, simple, and hassle-free.
- Naturally sweetened – No refined sugar, just wholesome ingredients.
- Vegan & dairy-free – A delicious dessert everyone can enjoy!
Enjoy these creamy, nutty, and fruity cheesecake squares, and if you love them, share the recipe!

by Feeling Great | Dessert Recipes
Choco Cherry Sensation
A Decadent Wholesome Choco Cherry Dessert
Indulge in this Choco Cherry Sensation—a rich, creamy, and flavor-packed treat that satisfies your sweet tooth without the guilt. Made with real cherries, coconut cream, and cacao, it’s the perfect balance of sweet, smooth, and chocolatey goodness.
This dessert is a festive delight, making it great for Christmas celebrations or a summer treat that won’t derail your health goals. Plus, it’s dairy-free, naturally sweetened, and incredibly easy to make.
Ingredients
Cherry Layer
- 2 tbsp coconut cream
- 2 cups frozen pitted cherries
- 2 frozen bananas, chopped
Coconut Layer
- 6 tbsp coconut cream
- 4 tsp maple syrup
- 1 tsp vanilla extract
Chocolate Layer
- 4 tsp maple syrup
- 4 tsp cacao powder
- 2 tsp coconut oil (liquid)
How to Make Choco Cherry
- Blend the Cherry Layer: Add all the cherry layer ingredients to a processor and blend until smooth, resembling ice cream.
- Prepare the Coconut Layer: In a bowl, mix the coconut cream, maple syrup, and vanilla extract until combined.
- Mix the Chocolate Layer: In a separate bowl, stir together the maple syrup, cacao powder, and coconut oil until smooth.
- Assemble & Enjoy: Layer the mixtures in a jar in any order you prefer. Enjoy immediately or freeze for a chilled dessert.
This guilt-free Choco Cherry indulgence is packed with natural sweetness, healthy fats, and antioxidants. Try it, and savor every spoonful!
Interested more with dessert recipes? You can check Stuffed Butternut Pumpkin with Lemon Cream Sauce Try this and share with your love ones!
BOOK HERE for a consultation with me, let’s start living healthy.

by Feeling Great | Dessert Recipes, Snack Recipes
A Healthier, Guilt-Free Homemade Hazelnut Spread
Love Homemade Hazelnut Spread in a healthier alternative? This homemade chocolate hazelnut spread is rich, creamy, and naturally sweetened—with none of the artificial ingredients! Made from roasted hazelnuts, pure cacao, and natural sweeteners, it’s a treat you can enjoy without the guilt.
Indulge this delicious Chocolate Nutella that is perfect for toast, pancakes, smoothies, or simply dipping with fresh fruit. Plus, it’s gluten-free, dairy-free, and refined sugar-free.
Ingredients (Serves 4)
- 1 cup hazelnuts (soaked for 2 hours)
- 4 tbsp raw cacao powder
- 1 tsp ground cinnamon
- ½ tsp vanilla extract
- ½ cup coconut nectar, maple syrup, raw honey, or rice malt syrup
- 2 tbsp coconut oil or ghee
How to Make Hazelnut Spread
- Blend the hazelnuts in a high-powered blender or food processor until they form a smooth paste.
- Add cacao, cinnamon, vanilla, and your choice of sweetener. Blend again until well combined.
- Pour in the coconut oil or ghee and continue blending until the texture is silky smooth.
- Serve & Enjoy: Pair with fresh strawberries, sliced bananas, or a sprinkle of shredded coconut.
This healthy Chocolate Nutella a Hazelnut Spread is creamy, chocolatey, and packed with goodness—a delicious alternative without unnecessary additives!
You can try this No-Bake Snack Bars and share your thoughts if you love it! Need extra support? CLICK HERE to book a consultation and get a personalized nutrition plan to feel your best.

by Feeling Great | Dessert Recipes
Mango, Lime, and Coconut Icy Treats: A Refreshing Summer Delight
Looking for a cool, refreshing treat to beat the summer heat? These mango, lime, and coconut icy treats are perfect for both kids and adults! They’re naturally sweet, dairy-free, and free from artificial colors or preservatives—just pure, wholesome goodness.
Whether you’re by the pool, at the beach, or simply craving a tropical-flavored snack, these frozen delights will keep you refreshed and satisfied.
Why You’ll Love These Icy Treats
- 100% natural – No artificial flavors or preservatives.
- Creamy & refreshing – Coconut yogurt or milk creates a deliciously smooth texture.
- Tropical flavors – The perfect balance of sweet mango, tangy lime, and creamy coconut.
- Easy to make – Just blend, freeze, and enjoy!
Ingredients (Makes 4–6 Icy Treats)
- 6 mango cheeks (fresh or frozen)
- 1 lime (juice of, zest for garnish)
- 1.5 cups coconut yogurt or coconut milk
- 2 teaspoons shredded coconut
How to Make These Tropical Frozen Treats
Step 1: Blend Until Smooth
In a high-powered blender or food processor, combine the mango, lime juice, and coconut yogurt (or milk). Blend until the mixture is completely smooth and creamy.
Step 2: Pour & Freeze
Carefully pour the mixture into ice block molds. For extra flavor, sprinkle lime zest and shredded coconut on top before freezing.
Step 3: Freeze & Enjoy
Place the molds in the freezer for at least 4–6 hours, or until completely frozen. Once ready, pop them out and savor the tropical goodness!
Extra Tip: Customize Your Icy Treats
- Want more variety? Add strawberries, pineapple, or passionfruit for an extra fruity twist!
- Like a touch of freshness? Blend in some mint leaves for a cooling effect.
- Craving chocolate? Drizzle melted dark chocolate over the frozen treats before serving.
Final Thoughts
These mango, lime, and coconut icy treats are the perfect guilt-free summer snack. Whether you’re making them for the kids or yourself, they’re a deliciously refreshing way to stay cool on a hot day.
Read this Mango Coconut Millet or you can have this Apple and Cinnamon Bread have you tried this recipe? Let me know in the comments! And if you love it, don’t forget to share it with friends!
CLICK HERE to book a consultation with me, let me help you with a customized health plan!

by Feeling Great | Dessert Recipes
Light & Airy Strawberry Mousse: A Refreshing Dessert for Any Occasion
Looking for a dessert that’s light, creamy, and bursting with fresh flavor? This strawberry mousse is the perfect treat! With a smooth texture and natural berry sweetness, it’s a delightful choice for warm days, special gatherings, or whenever you crave something sweet yet refreshing.
Why You’ll Love This Strawberry Mousse
This whipped strawberry delight is:
- Light and fluffy – A dreamy, airy texture that melts in your mouth.
- Quick and easy – Made with just a few simple ingredients.
- Naturally sweet – Fresh strawberries bring a burst of flavor.
Whether you’re hosting a dinner party, celebrating a special moment, or enjoying a cozy night in, this mousse is sure to impress!
Simple Ingredients for a Perfect Treat
You only need four ingredients to make this refreshing dessert:
- 1 cup fresh strawberries
- ¼ cup coconut sugar or maple syrup (adjust to taste)
- 1 cup thick coconut milk
- 8 fresh mint leaves
How to Make Strawberry Mousse
- Blend strawberries, sweetener, coconut milk, and mint leaves until smooth.
- Chill in the refrigerator before serving.
- Enjoy this refreshing, creamy mousse!
Too easy! Try it today and let me know in the comments how you like it. If you love it, share this recipe with family and friends—because dessert is always better when shared!
You can also try this strawberry recipe! The Strawberry and Coconut Thickshake and share with your friends if you love it! To book a consultation with me, CONTACT me here so we can start your customize health plan.


