by Feeling Great | Snack Recipes
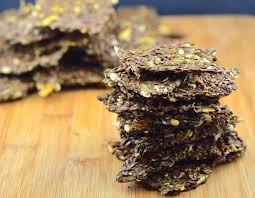
Homemade Seed Crackers – Crispy, Nutritious & Easy
Why Make Your Own Seed Crackers?
These homemade seed crackers are gluten-free, crunchy, and full of nutrients. The best part? They’re easy to make—just plan ahead, as they need soaking overnight.
Supermarket shelves are packed with biscuits, but have you ever checked the ingredient list? Some contain unnecessary additives that aren’t exactly healthy. Instead of buying expensive store-bought options, try making your own for a fraction of the cost.
Ingredients (Makes 4 Servings)
- 160g brown linseeds
- 80g mixed seeds (pumpkin, sunflower, sesame)
- ½ tsp sea salt
- 1 tsp favorite spice (fennel, cumin, smoked paprika, cayenne)
Simple Steps to Make Seed Crackers
- Soak linseeds in water overnight. Cover with about 2cm extra water.
- Soak mixed seeds separately in another bowl overnight.
- The next morning, drain mixed seeds and combine them with jelly-like linseeds. Stir in salt and spice.
- Preheat oven to 50°C (or its lowest setting).
- Spread thinly onto a lined baking tray.
- Bake for 6 hours, flipping halfway and removing the paper.
- Cool completely before breaking into pieces.
Enjoy & Store
Pair these crispy seed crackers with hummus, guacamole, or your favorite dips. Store in an airtight container for up to two weeks. Enjoy anytime!
You can also read this Quinoa Fritters recipe and give a try! Book Here for your healthy future to feel great.

by Feeling Great | Snack Recipes
Beetroot Hummus Dip – A Delicious Chickpea-Free Alternative
A Paleo-Friendly & Nutrient-Dense Hummus Beetroot
This Hummus beetroot is the perfect alternative! It’s smooth, creamy, and paleo-friendly. The natural sweetness of beetroot, combined with the richness of tahini and zesty lemon, creates an irresistible spread.
Not only does it taste incredible, but it’s also rich in antioxidants, fiber, and healthy fats. Plus, you can switch it up by using carrots instead of beets for a delicious variation.
It’s simple to make and pairs wonderfully with seed crackers, fresh vegetables, or even as a spread on wraps and sandwiches.
Ingredients (Makes 500mL)
- 500g beetroot
- 3 tbsp tahini
- 1 garlic clove
- 2 tbsp extra virgin olive oil
- 2 tbsp lemon juice
- 1 tbsp apple cider vinegar
- 2 tsp ground cumin
- ½ tsp sea salt
Simple Steps to Make Beetroot Hummus Dip
- Preheat oven to 200°C.
- Wrap beetroot in foil and roast for 30-40 minutes until tender.
- Let it cool, then peel and chop (Tip: Roast it the night before to save time!).
- Blend beetroot with all ingredients in a food processor until smooth.
- Taste and adjust seasoning if needed.
Serve & Store
Enjoy this hummus, Serve with seed crackers (recipe on the website) or fresh veggies like carrot, cucumber, celery, and broccoli. Store in the fridge for up to 5 days. Enjoy!
For more Beetroot recipe, try and read this Beetroot Soup! If you need any personalize health plan? I can help you with that! CLICK HERE to contact me for more information.

by Feeling Great | Recipes, Snack Recipes
Coconut Bars – A Healthy, Gluten-Free Treat
Perfect for Lunchboxes & Snacking – Coconut Bars
These nutritious coconut bars are a great snack option that’s both gluten-free and dairy-free, yet absolutely delicious! They are naturally sweetened with dates and have a soft, chewy texture with a rich coconut flavor.
Perfect for lunchboxes, afternoon snacks, or even a healthy dessert, these bars are easy to make and require simple, wholesome ingredients. Keep them chilled in the fridge for a refreshing, guilt-free treat anytime!
Ingredients (Makes 12 Bars)
- 2 eggs
- 1 cup coconut milk
- 6 tbsp coconut oil
- ¾ cup soaked dates
- ½ cup almond meal
- 1 tbsp vanilla extract
- 1 tbsp coconut flour (or 2 tbsp extra almond meal if unavailable)
- 1½ cups unsweetened shredded coconut
- ¼ tsp Celtic sea salt
How to Make Coconut Bars
Prep & Blend the Ingredients
- Preheat oven to 180°C (350°F).
- In a food processor, blend eggs, coconut milk, soaked dates, and vanilla until smooth.
- Pulse in almond meal, coconut flour, shredded coconut, and salt until well combined.
Bake to Perfection
- Pour the mixture into a 20×20 cm (8×8 inch) baking dish lined with parchment paper.
- Bake for 30 minutes, or until the top is lightly golden.
Cool & Serve
- Allow the bars to cool for 30 minutes at room temperature.
- Transfer to the fridge and chill before serving.
Enjoy Anytime!
These coconut bars are perfect for meal prep and can be stored in the fridge for up to a week. Serve them chilled for the best texture and flavor!
If you love this recipe, share it with others and let us know your thoughts in the comments below!

by Feeling Great | Snack Recipes
Delicious Baked Sweet Potato Fries with a Savory Twist
These sweet potato fries are a nutritious alternative to traditional deep-fried versions. They’re crispy on the outside, soft inside, and naturally flavorful.
For a savory spin, swap the cinnamon for black pepper and cayenne, or try a rosemary and Himalayan salt variation for extra flavor.
Enjoy them as a side dish, snack, or appetizer—perfect for any meal!
Ingredients (Serves 4)
- 4 medium sweet potatoes, scrubbed
- 2 tbsp ghee or coconut oil, melted
- ½ tsp ground cinnamon (optional)
- ¼ tsp salt
How to Make Sweet Potato Fries
Prep the Potatoes
- Preheat the oven to 200°C.
- Cut off the ends of the sweet potatoes. If they’re not organic, peel them.
- Slice lengthwise, then cut into ¼-inch thick strips.
Season & Bake
- In a large bowl, toss the fries with coconut oil, cinnamon, and salt, ensuring even coating.
- Spread them evenly on a baking sheet.
- Bake for 40-45 minutes, flipping halfway through, until edges are lightly browned and crisp.
Serve & Enjoy!
These crispy, homemade sweet potato fries are full of flavor and incredibly easy to make. Serve them with your favorite dips or enjoy them on their own. Try different seasonings and let us know your favorite variation in the comments!
You can also try this Satisfying Sweet Tooth – Healthy Recipes or this Lime and Date Energy Balls and share with me your experiences.
Book a consultation today and let’s get you back to feeling your absolute best! You deserve to feel fantastic every day!

by Feeling Great | Snack Recipes
Artichoke Hummus – A Creamy, Nutrient-Packed Dip
A Healthy, Artichoke Hummus Dairy-Free & Vegan Snack
Craving a quick, healthy dip without all the cream cheese and fillers? This artichoke hummus is your answer!
It’s dairy-free, gluten-free, and vegan, making it a great choice for a nutritious snack. Enjoy it with celery, cucumber, carrot sticks, or linseed crackers for a delicious brain-boosting treat.
Did you know your brain is your hungriest organ? It makes up just 2% of your body weight, yet it uses:
- 25% of the oxygen you breathe
- Up to 50% of the carbs you consume
- 20% of your heart’s blood supply
Better food choices can improve focus, enhance learning, and boost neural function. So, let’s nourish your brain with this simple and tasty hummus!
Ingredients (Makes 1¾ Cups)
- 1 x 425g can chickpeas (or dried, soaked, and cooked)
- 1 x 400g jar artichoke hearts (in water)
- 2 cloves garlic, peeled
- 2 tbsp tahini
- 1 tbsp olive oil
- 1 medium lemon, juiced
- 1 tsp ground cumin
- Sea salt & pepper, to taste
How to Make Artichoke Hummus
Drain & Prep
- Drain the chickpeas and artichokes, squeezing them gently to remove excess water.
Blend Until Smooth
- Add all ingredients to a food processor or Thermomix.
- Blend until creamy. If it’s too thick, add a little water until you reach your desired consistency.
Season & Serve
- Taste and adjust seasoning with salt and pepper.
- Serve with fresh veggie sticks or crackers.
Enjoy This Brain-Boosting Hummus!
This creamy, flavorful dip is a fantastic alternative to store-bought hummus. Plus, it’s packed with nutrients that support brain health and overall wellness.
Here’s another recipe the Beetroot Hommus try it today and let us know your favorite way to enjoy it in the comments!
Need help? CLICK HERE to book a session and take the first step toward a healthy life.

by Feeling Great | Dessert Recipes, Snack Recipes
A Healthier, Guilt-Free Homemade Hazelnut Spread
Love Homemade Hazelnut Spread in a healthier alternative? This homemade chocolate hazelnut spread is rich, creamy, and naturally sweetened—with none of the artificial ingredients! Made from roasted hazelnuts, pure cacao, and natural sweeteners, it’s a treat you can enjoy without the guilt.
Indulge this delicious Chocolate Nutella that is perfect for toast, pancakes, smoothies, or simply dipping with fresh fruit. Plus, it’s gluten-free, dairy-free, and refined sugar-free.
Ingredients (Serves 4)
- 1 cup hazelnuts (soaked for 2 hours)
- 4 tbsp raw cacao powder
- 1 tsp ground cinnamon
- ½ tsp vanilla extract
- ½ cup coconut nectar, maple syrup, raw honey, or rice malt syrup
- 2 tbsp coconut oil or ghee
How to Make Hazelnut Spread
- Blend the hazelnuts in a high-powered blender or food processor until they form a smooth paste.
- Add cacao, cinnamon, vanilla, and your choice of sweetener. Blend again until well combined.
- Pour in the coconut oil or ghee and continue blending until the texture is silky smooth.
- Serve & Enjoy: Pair with fresh strawberries, sliced bananas, or a sprinkle of shredded coconut.
This healthy Chocolate Nutella a Hazelnut Spread is creamy, chocolatey, and packed with goodness—a delicious alternative without unnecessary additives!
You can try this No-Bake Snack Bars and share your thoughts if you love it! Need extra support? CLICK HERE to book a consultation and get a personalized nutrition plan to feel your best.


