
by Feeling Great | Snack Recipes
Crispy Kale Chips – A Healthy and Delicious Snack
Why Crispy Kale Chips Are a Game Changer
Looking for a nutritious and tasty alternative to regular chips? Crispy Kale Chips are a crunchy, flavorful, and nutrient-packed snack that will satisfy your cravings without the guilt.
Unlike traditional potato chips, which contain lectins, enzyme blockers, and glycoalkaloids that aren’t destroyed during cooking, kale is loaded with vitamins, minerals, and antioxidants. It’s an excellent source of iron, vitamin K, vitamin C, calcium, and fiber—all essential for good health.
If you’re looking for a better option, try kale chips. They’re easy to make, packed with flavor, and great for snacking any time of the day.
Simple Homemade Kale Chips Recipe
Ingredients (Serves 2-3):
- 1 bunch kale (about 400g)
- 1 tablespoon melted coconut oil, ghee, or olive oil
- Sea salt (Himalayan or Celtic salt)
Step-by-Step Method
1. Preheat and Prepare Your Trays
Set your oven to 120°C and line 2-3 baking trays with parchment paper. This helps prevent sticking and ensures even cooking.
2. Wash and Dry the Kale
Rinse the kale thoroughly in cold water, then pat it dry with a clean towel. Removing excess moisture is key to getting crispy chips.
3. Remove Stems and Tear Into Pieces
Cut away the tough central stalks and tear the leaves into bite-sized pieces. This makes them easier to eat and helps them cook evenly.
4. Toss with Oil and Salt
Place the kale in a large bowl and drizzle with melted oil. Sprinkle lightly with salt—kale has a natural saltiness, so a little goes a long way. Toss everything together until well coated.
5. Arrange for Maximum Crispiness
Spread the kale evenly on the trays in a single layer. Overcrowding can cause steaming instead of crisping, so use extra trays if needed.
6. Roast to Perfection
Bake for 35-40 minutes, or until crispy. Keep an eye on them, as oven temperatures can vary. If they start to brown too quickly, reduce the heat slightly.
7. Enjoy or Store for Later
Eat them immediately for the best crunch. If storing, keep them in an airtight container in your pantry for up to two weeks. If they lose their crispiness, simply pop them back in the oven for 5-10 minutes to refresh them.
Delicious Flavor Variations
Want to mix things up? Try these tasty seasoning ideas:
🌶 Spicy Kick – Add chili powder or smoked paprika.
🌿 Herby Twist – Sprinkle with dried oregano, basil, or thyme.
🥜 Nutty Crunch – Toss with sesame seeds or crushed nuts.
🍋 Zesty Flavor – Drizzle with lemon juice before roasting.
What’s Your Favorite Kale Chip Flavor?
Do you love classic salted kale chips, or do you have a favorite seasoning twist? Try out different flavors and let me know which one you love the most!
Looking for more healthy snack ideas? Stay tuned for more easy, nutritious recipes like this No Bake Snack Bar!
Let’s talk about your personalized health plan and Contact me Here.
by Feeling Great | Snack Recipes
Homemade Seed Crackers – Crispy, Nutritious & Easy
Why Make Your Own Seed Crackers?
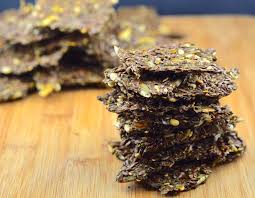
These homemade seed crackers are gluten-free, crunchy, and full of nutrients. The best part? They’re easy to make—just plan ahead, as they need soaking overnight.
Supermarket shelves are packed with biscuits, but have you ever checked the ingredient list? Some contain unnecessary additives that aren’t exactly healthy. Instead of buying expensive store-bought options, try making your own for a fraction of the cost.
Ingredients (Makes 4 Servings)
- 160g brown linseeds
- 80g mixed seeds (pumpkin, sunflower, sesame)
- ½ tsp sea salt
- 1 tsp favorite spice (fennel, cumin, smoked paprika, cayenne)
Simple Steps to Make Seed Crackers
- Soak linseeds in water overnight. Cover with about 2cm extra water.
- Soak mixed seeds separately in another bowl overnight.
- The next morning, drain mixed seeds and combine them with jelly-like linseeds. Stir in salt and spice.
- Preheat oven to 50°C (or its lowest setting).
- Spread thinly onto a lined baking tray.
- Bake for 6 hours, flipping halfway and removing the paper.
- Cool completely before breaking into pieces.
Enjoy & Store
Pair these crispy seed crackers with hummus, guacamole, or your favorite dips. Store in an airtight container for up to two weeks. Enjoy anytime!
You can also read this Quinoa Fritters recipe and give a try! Book Here for your healthy future to feel great.

by Feeling Great | Snack Recipes
Beetroot Hummus Dip – A Delicious Chickpea-Free Alternative
A Paleo-Friendly & Nutrient-Dense Hummus Beetroot
This Hummus beetroot is the perfect alternative! It’s smooth, creamy, and paleo-friendly. The natural sweetness of beetroot, combined with the richness of tahini and zesty lemon, creates an irresistible spread.
Not only does it taste incredible, but it’s also rich in antioxidants, fiber, and healthy fats. Plus, you can switch it up by using carrots instead of beets for a delicious variation.
It’s simple to make and pairs wonderfully with seed crackers, fresh vegetables, or even as a spread on wraps and sandwiches.
Ingredients (Makes 500mL)
- 500g beetroot
- 3 tbsp tahini
- 1 garlic clove
- 2 tbsp extra virgin olive oil
- 2 tbsp lemon juice
- 1 tbsp apple cider vinegar
- 2 tsp ground cumin
- ½ tsp sea salt
Simple Steps to Make Beetroot Hummus Dip
- Preheat oven to 200°C.
- Wrap beetroot in foil and roast for 30-40 minutes until tender.
- Let it cool, then peel and chop (Tip: Roast it the night before to save time!).
- Blend beetroot with all ingredients in a food processor until smooth.
- Taste and adjust seasoning if needed.
Serve & Store
Enjoy this hummus, Serve with seed crackers (recipe on the website) or fresh veggies like carrot, cucumber, celery, and broccoli. Store in the fridge for up to 5 days. Enjoy!
For more Beetroot recipe, try and read this Beetroot Soup! If you need any personalize health plan? I can help you with that! CLICK HERE to contact me for more information.

by Feeling Great | Lunch Recipes
Vietnamese Chicken Salad – Fresh, Zesty & Flavorful
A Classic Vietnamese Chicken Salad Dish with a Twist
This Vietnamese chicken salad is bursting with fresh herbs, crunchy vegetables, and a bold, tangy dressing. The beauty of this dish is its versatility—you can prepare the chicken in different ways (steamed, poached, grilled, or roasted) or swap it for beef, prawns, lamb, or fish.
The key to making this salad stand out is using loads of fresh herbs for maximum flavor. And, of course, the fish sauce dressing ties everything together beautifully.
Ingredients (Serves 4–6)
Salad Base:
- ½ small (300g) wombok (Chinese cabbage), shredded
- 2 handfuls fresh coriander leaves
- 1 handful fresh mint leaves
- 1 handful Thai basil (optional)
- 1 large carrot, grated
- 80g crushed almonds
Pickled Shallots:
- 2 red Asian shallots (or substitute red onion)
- 3 tbsp apple cider vinegar
Marinated Chicken
- 1kg chicken marylands
- 1 tbsp finely grated ginger
- 2 large garlic cloves, crushed
- 3 tbsp fish sauce
- 3 tbsp melted coconut oil
- Salt and pepper to taste
Fish Sauce Dressing
- 170ml fish sauce
- 2 tbsp honey
- 2 tbsp finely grated ginger
- 3 garlic cloves, crushed
- 1–2 long red chilies, finely chopped
- 3–4 tbsp lime juice
Step-by-Step Instructions for Vietnamese Chicken Salad
1. Prepare the Chicken
- Preheat your oven to 200°C (392°F).
- In a baking dish, coat chicken with ginger, garlic, fish sauce, salt, and 2 tbsp coconut oil. Let marinate for 10–20 minutes (or bake immediately if short on time).
- Bake for 20 minutes, or until cooked through. Set aside to cool.
2. Pickle the Shallots
- Thinly slice the shallots and place them in a bowl.
- Add apple cider vinegar and let sit for 20 minutes, then drain.
3. Assemble the Salad
- In a large bowl, toss together cabbage, herbs, and grated carrot.
4. Make the Dressing
- Mix fish sauce, honey, ginger, garlic, chili, and lime juice with 80ml water. Adjust with extra lime juice if needed.
- Tip: Store any extra dressing in an airtight jar in the fridge for up to 1 month.
5. Final Assembly & Serving
- Once the chicken has cooled, shred the meat using a fork or your hands.
- Toss the shredded chicken into the salad and mix with enough dressing to coat.
- Top with crushed almonds and pickled shallots.
Final Thoughts
This healthy salad will keep you energize for the rest of the day! Enjoy this vibrant, fresh, and nourishing dish!
Here’s another chicken salad recipe Mason Jar Chicken Salad or you can try this Vietnamese Dish recipe you and enjoy. CLICK HERE to contact me now for your feeling great journey.

by Feeling Great | Dinner Recipes
How to Make the Perfect Salad Dressings
Making your own fresh, preservative-free salad dressings at home is easy and rewarding. This simple guide will show you how to create the perfect dressing to elevate your salads.
Why Homemade Salad Dressings Are the Best
As the weather warms, fresh, vibrant salads become a go-to for lunch or dinner. They’re an easy way to boost your health. The secret to making a salad truly satisfying lies in the dressing. A great dressing brings together the crisp textures, bold colors, and fresh flavors, making every bite enjoyable.
The best part? Homemade dressings are healthier, fresher, and easier to make. Plus, you have full control over the flavors and ingredients, which means no hidden preservatives or additives.
Types of Dressings
There are two main styles of salad dressings:
- Shaken Dressings: These are quick to make, requiring only 2-3 parts healthy oil and 1 part acidity (like vinegar or lemon). Just pour into a glass jar and shake it up!
- Blended Dressings: These use vegetables, herbs, or fruits blended with a little olive oil. They’re creamy and full of flavor.
Choosing the Right Oils for Your Dressing
For a healthy dressing, I love using cold-pressed vegetable, nut, or seed oils. Some of my favorites include Extra Virgin Olive Oil, walnut oil, and avocado oil. These oils are rich in heart-healthy fats that support your overall well-being.
Mediterranean oils, like olive oil, are especially beneficial as they are rich in monounsaturated fats and omega-3 fatty acids. These nutrients help reduce inflammation, fight heart disease, lower cholesterol, and support a healthy immune system.
Supporting Ingredients for Extra Flavor
To add flavor and balance, dressings need a touch of acidity. I prefer using ingredients like balsamic vinegar, apple cider vinegar, wine vinegar, or citrus juice (lemon or lime). For a creamier dressing, add a bit of Dijon mustard, tahini, or natural yogurt to help emulsify and thicken the dressing.
Different Recipes Salad Dressings
Simple French Dressing
- 1 tablespoon red or white wine vinegar
- ½ teaspoon Dijon mustard
- 3 tablespoons (45 ml) cold-pressed oil (olive, walnut, flaxseed)
- Black pepper to taste
Instructions:
- Combine vinegar and mustard in a bowl.
- Whisk in the oil until it becomes creamy.
- Store in a glass jar for up to 2 weeks.
This simple dressing is perfect for most salads and vegetables.
Parsley + Mint Salsa Verde
- 1 bunch parsley
- 1 bunch mint
- Zest and juice from 1/2 – 1 lemon
- 1/2 cup cold-pressed oil (olive, flaxseed, walnut, avocado)
Instructions:
- Combine all ingredients in a high-speed blender.
- Blend until smooth, adjusting the consistency with more oil if needed.
- Store in the fridge for up to 1 week.
Enjoy with green salad leaves or vegetables.
Raspberry Dressing
- 100g (1/2 cup) raspberries
- 60 ml (1/4 cup) cold-pressed oil (olive, flaxseed, walnut)
Instructions:
- Smash raspberries with a fork.
- Whisk in the oil for a chunky dressing or blend for a smooth texture.
- Store in the fridge for up to 4 days.
Perfect for garden or leafy salads.
Pomegranate Dressing
- 3 tablespoons pomegranate molasses
- 1 lemon (juice and zest)
- 2 teaspoons honey
- 100 ml cold-pressed olive oil
- Fresh ground pepper to taste
Instructions:
- Combine all ingredients until creamy.
- Adjust taste as needed.
- Store in a jar in the fridge for up to 7 days.
Ideal for Mediterranean-style salads.
Balsamic Honey + Walnut Dressing
- 1/4 cup aged balsamic vinegar
- 2 teaspoons Dijon mustard
- 2 teaspoons honey
- 2 tablespoons finely chopped roasted walnuts
- 2 tablespoons cold-pressed oil (optional)
Instructions:
- Combine all ingredients.
- Add oil if you prefer a milder flavor.
- Store in the fridge for up to 5 days.
Delicious with spinach leaves and shaved Parmesan.
Caesar Dressing
- 2 limes
- 2 cloves garlic, smashed
- 1/4 teaspoon Dijon mustard
- 125 ml cold-pressed olive oil
- Pinch of sea salt and black pepper
Instructions:
- Combine all ingredients until smooth and creamy.
- Season to taste.
- Store in the fridge for up to 1 week.
Final Thoughts
Enjoy with fresh Caesar salads. I love making mine with baby cos lettuce, avocado, and a soft poached egg. Add a little fresh grated Parmesan for extra flavor.
These easy, flavorful dressings can transform any salad. You can also read the Green Goddess Dressing or a salad recipe to pair with the salad dressing like Kale Salad and try them out, and feel free to adjust the ingredients to match your personal tastes.
CLICK HERE to book a session with me, and let’s make your personalized health plan.

by Feeling Great | Recipes, Vegetarian Recipes
Green Goddess Dressing – Fresh, Creamy & Packed with Flavor
A Quick & Delicious Green Goddess Dressing
This Green Goddess dressing is the perfect way to elevate any salad with its vibrant, herb-packed flavor. It’s creamy, fresh, and incredibly easy to make. Plus, it pairs beautifully with chicken, roasted veggies, or as a dip.
If you’re short on time but still want bold, zesty flavors, this dressing is your go-to. It’s also dairy-free and can be easily adjusted to suit your taste.
Ingredients
- ½ avocado
- 3 tbsp coconut milk
- 4 tbsp lemon juice
- 1 garlic clove, finely chopped
- ½ cup fresh parsley, roughly chopped
- 4 tbsp basil leaves, roughly chopped
- ½ tsp sea salt
- 125ml extra virgin olive oil
- Optional: 1-2 anchovy fillets (use less salt if adding)
How to Make Green Goddess Dressing
- Blend all ingredients (except olive oil) in a food processor or blender.
- With the motor running, slowly drizzle in the olive oil until the mixture thickens and herbs are finely chopped.
- Taste and adjust seasoning if needed.
How to Use It
This creamy dressing is perfect for:
- Drizzling over fresh salads
- Tossing with roasted veggies
- A dip for raw vegetables
- A flavorful sauce for grilled chicken
Store in the fridge for up to 5 days. It often tastes even better the next day as the flavors deepen. Enjoy!


